Tuesday, February 23, 2016

Making Something Simple, Pretty

I feel like I say this a lot, but it has been a while.  I hope to one day get back on track with the whole blogging thing since it is an aspect of my life that I truly enjoy and gives me a few moments alone with myself...usually...where I talk about the things I'm passionate about.  One day I will get back to doing it daily...or at least weekly.  Maybe after my oldest starts kindergarten in the fall or when my youngest can entertain herself without needing mommy's attention every five minutes.  Like I said...one day.  And sadly, that one day will probably happen before I am ready for it to.  So for know, dear readers, I hope that you can be satisfied with my scattered communications!

Now for the juicy stuff...

In the culinary world, chef's have an expression.  "You eat with your eyes first."  I'm not sure who the first person to coin this phrase was, but I do know there have been more than a few times I have looked at food (mine or someone else's) and thought, "I'm not eating that, it looks awful!"  I grew up in the days of t.v. dinners, casseroles and good 'ole SPAM.  How can you make some of those things "look" good even if some of the MAY taste good? 

As much as some of you may want me to, I'm not here to elevate the likes of the everyday casserole.  It is a rich, creamy, gooy, wonderful in every way and meant to look like a lunch lady slapped it on your plate...except DELISIOUS!!  I'm also not going anywhere close to SPAM.  My mom used to try to elevate SPAM by scoring it like ham and sticking in little cloves for decoration, trust me, it doesn't work, it's gross.  What I would like to put up for your consideration is a little elevation of the classic t.v. dinner that, while does take more than 4-5 minutes on high in your microwave, won't have you spending all night in the kitchen either.

So what made up t.v. dinners anyway?  There was always some sort of "main course," protein usually, a starch, a vegetable and (if you were lucky) a little sweet treat at the end.  My sister and I would have these whenever my parents went out for the evening.  I remember liking very few of them and trying on more than one occasion to throw them in the trash can.  I wasn't very good at covering up the evidence though, so I got in trouble a lot for that particular hijinks.  But I digress.  At the heart of them, it really is what most families are looking for when looking for dinner.  Protein, vegetable, starch...and if you eat good...dessert.  And this week, I think I found the perfect alternative.


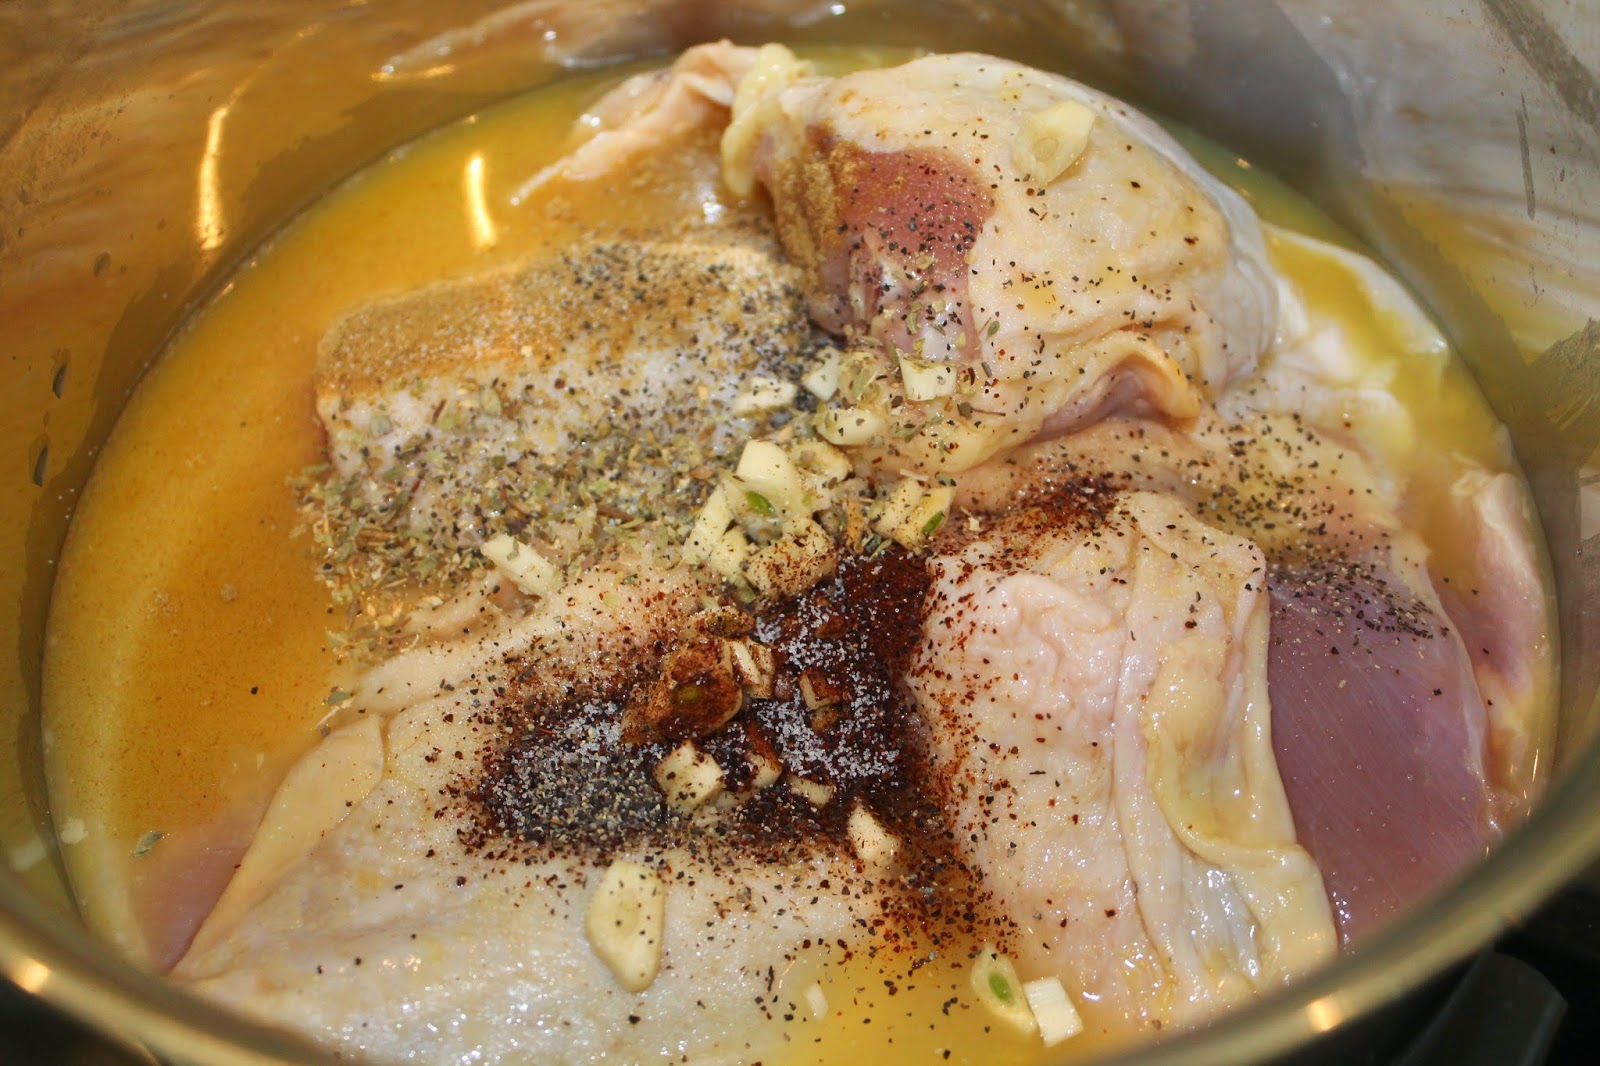
I give to you this weeks "t.v. dinner"!  Chicken Thighs in Mushroom Cream Sauce with Mashed Potatoes at Green Beans.  I'm going to go ahead and fess up to two secrets here. 

1 - I didn't make the mashed potatoes myself.  I can, but that's a long process.  I have fallen in love with Simply Potatoes Garlic Mashed Potatoes, so that's my go to when I know I don't have the time to make them from scratch.  And let's be honest, who has time for that anyway?!?

2 - Those ARE fresh green beans...BUT...I bought them in a nice little one pound bag already cleaned and prepped and ready to go.  I could have even steamed them in the bag they came in, but since my microwave was taken up by heating the potatoes, I threw them in some salted boiling water and 7 minutes later, they were done!  *Side note - Sometimes I like to throw a cube of chicken bouillon in with my green beans to give a little more flavor, this time I just forgot! *

Side dishes down, I turned to the main course.  I found this recipe on Pinterest, because where else does one find recipes nowadays.  With a few minor tweaks, this recipe was golden.  AND 30 minutes, start to eating.  SCORE!!  So next time your planning your dinner, just remember that you don't have to feel guilty when you can't produce a four course meal worthy of a fine dining restaurant for your family.  Just make the simple stuff work for you!!

Chicken Thighs in Mushroom Cream Sauce recipe adapted from Better Homes and Gardens
Makes 4 servings

4 chicken thighs; skin on
salt and pepper
4 T fresh rosemary; chopped
4 T fresh thyme; chopped
1 T olive oil
6 oz cremini mushrooms; sliced
4 oz shiitake mushrooms; sliced
1 T flour
1 c chicken broth
1/2 c white wine (or more chicken broth) *The alcohol does cook off*
2 T grainy mustard

1 - Preheat oven to 400 degrees.
2 - Season both sides of chicken with salt and pepper.  Mix together rosemary and thyme.  1 T of mixture on the skin side of each chicken thigh.
3 - Heat the olive oil in a skillet big enough to hold all thighs at once.  Add chicken, skin side down, to the hot oil and cook 5-7 minutes until well browned.  Transfer to a sheet tray and put in the oven.  Bake at 400 degrees for 15-20 minutes.
4 - Meanwhile, add mushrooms to the same skillet and cook until they begin to soften.  Add flour and stir to coat the mushrooms.  Add broth, wine, mustard and remaining herbs to the skillet.  Cook, stirring occasionally, until the mixture is thickened and bubbly.  The beauty is this will happen about the same time your chicken is done.  SCORE!
5 - Serve your chicken covered in sauce accompanied by green beans and mashed potatoes (no shame if you don't make them yourself).  Any extra sauce is lovely stirred into to those hot potatoes!

ENJOY!


Wednesday, August 19, 2015

What the End of Summer Really Means...


Yes, folks, it's that time of year again.  The end of August is fast approaching, and with it bringing the end of days in the sun, fun at the pool, relaxation and the beginning of back to school, sports and hectic schedules.  But what does the end of summer really mean...for teachers?

Recently on social media I've seen several posts asking teachers not to post things that make going back to school "sound like a negative thing."  People making comments about how teachers posting things like "end of freedom" or "school's starting again this week...can't believe it's time already" were making them feel as if teachers were "dreading" this time and didn't feel that was right.  I thought for a while about how...or if...I should reply to any of these comments and finally decided I should write a little something about what the end of summer really means, from a teacher's prospective.


For those of you who don't know, I was a teacher for 7 years of my life before my first daughter was born.  I left the profession after she was born for a number of reasons.  I would not have traded those 7 years for another profession at all.  I am proud to say that I was a teacher and looked forward every year to a new host of "kids" I would think of as my own.  But I also remember quite vividly what the end of August meant for me when I was teaching.  I'm hoping that this perspective may make people be a little kinder to teachers around this time of year.


The end of summer meant that I went from spending 10-15 hours a week planning and prepping for the school year to spending 30-40 hours a week (outside of the school day) planning and prepping for the days ahead. 

The end of summer meant that $40 I used to pamper myself with a mani/pedi went to buying school supplies that my "kids" desperately needed.

The end of summer meant saying goodbye to casually waking up, enjoying a cup of coffee and my breakfast while watching the news and saying hello to alarms going off before the sun comes up and hurrying out of the door to make sure I had enough time to get everything ready for the school day.

The end of summer meant going back to working two jobs...instead of one.  (That's right, teacher's don't have summer's "off").  Most work a second job all summer if not all throughout the year to make ends meat...on top of the training and workshops they go to for school.

The end of summer meant not being able to focus completely on my family at night but share that time returning emails and grading papers and worrying about children who are not my own...but feel like they are.

The end of summer meant the end of sunshine...since I went to and from home work in the dark most days...instead getting my sunshine from the sweet smiles of my "kids".

You see, summer really isn't a traditional vacation for teachers.  But a time to try and rejuvenate and come up with new and fresh ideas for the next year since your new group of "kids" may not respond to things the same way your last group of "kids did.  Trust me, you won't find any teacher I've ever met chilling on the beach from mid June through mid August...as much as we would want to!

Think about it this way.  How many working individuals out there haven't at one time or another felt just a little bit of disappointment when a vacation does end and you have to get back to your regularly scheduled program.  We all have.  It doesn't mean you don't love what you do.  It doesn't mean you put any less into your job.  It doesn't make you any less of a professional.  It makes you human.

Teachers everywhere are going back to school this week.  Teachers who care and love their jobs deeply are plunging head first back into the classroom to make sure everything is perfect for our children's school year ahead.  They will spend countless hours this week making sure everything in their classroom is perfect...or at least making it look like it is!  Trust me when I say, they love their jobs.  I haven't met a teacher that stays in the profession unless they love and are fulfilled by their position.  The "true" job of a teacher wouldn't be worth it unless that were the case.  It is one of the most important and under appreciated jobs that exist. They will get told multiple times this year, if not each month, each week or each day what they can and cannot say, what they can and cannot do, how they can and cannot teach. They take it in stride, most of the time with a smile. Give them this last bit of “freedom”.

So here is what I ask of you, dear readers.  The next time you see, hear or read something from a teacher about going back to school that may have been said in a moment of frustration, sleep deprivation or a good ole fashion need to vent, let it slide.  Don't take it personally.  Don't take it as a sign that they don't love their job.  Don't take it that they aren't looking forward to the new school year.  And most importantly, don't take it as they don't love your child.  They do...even if they haven't met them yet.  Let it slide.  Because one day soon that same teacher will let something you say out of frustration, sleep deprivation or a good ole fashion need to vent slide.  Remember as the summer comes to a close, there are a lot of emotions in a teacher's life.  Remember you are on the same team.  Remember you are in this together for the greater good of your child.  But most importantly, remember teacher's LOVE coffee and chocolate :)

So with that in mind, I give to you my (should be world famous) brownie recipe.  I've been making these delicious squares of chocolate heaven since I was about 10 years old.  It's one of the very few things I ever baked growing up.  They take 30 minutes, start to finish, and can be easily hidden in your desk to munch on once the kids are gone for the day.  Or just call me, and I'll bring them to you.  I can even deliver them disguised as some healthy alternative if you don't want to share!  Enjoy!

The Best Brownies EVER! (adapted from Hershey's)
Makes 16 brownies

1/2 c butter; melted
1 c sugar
1 T vanilla
2 eggs
1/2 c AP flour
1/3 c cocoa powder
1 T cinnamon
1/4 tsp baking powder
1/4 tsp salt

1 - Cream together butter, sugar and vanilla.  Add eggs, one at a time, incorporating each well. 
2 - Combine flour through salt.  Gradually add to butter mixture, stirring until combined.
3 - Spread batter out evenly on a well greased 9x9 glass baking dish.  Bake at 350 for 20 minutes.

Thursday, August 13, 2015

Welcome Back Solider!

Around the time we moved into our house last year, our neighbor's son joined the military.  I am, as always, eternally grateful for those in the service.  I know I don't have it in me to join so am thankfully for those that do! 

For the better part of the year, my neighbor's son has been in training and then stationed out of state.  She contacted me to let me know he was coming home and if I could make them a yummy dinner for the night.  I was more than happy to help her out.  After all, she needs to worry about spending time with her son and not slaving away in the kitchen! 

She chose for their dinner an extremely delicious and healthy Asian Chicken Salad.  When I posted the pic on social media, everyone thought it look phenomenal and wanted the recipe.  Mom and son both thought it was super yummy and spent the evening enjoying the good food while sharing some much needed quality time together.  So throw together this quick and easy salad and share a healthy meal and some quality time with your loved ones!


Asian Chicken Salad
Makes 4 servings

¼ c soy sauce
3 T fresh ginger; peeled, minced
¼ c canola oil
3 T hoisin sauce
1 T sesame oil
1 tsp Sriracha
2 large chicken breast
¼ c rice wine vinegar
½ lb Napa cabbage; thinly sliced
½ lb radicchio; thinly sliced
2 carrots; grated
6 green onions; thinly sliced
1/3 c fresh cilantro; roughly chopped
½ c slivered almonds
1 T sesame seeds
salt and pepper as needed
1 T sesame seeds; toasted
1 – In a bowl, whisk together soy sauce through Sriracha. 
2 – Season chicken breast on both sides with salt and pepper. Place chicken in a ziplock bag and pour 1/3 of the soy sauce mixture into the bag. Seal tightly and marinate at room temperature for 1 hour.
3 – Whisk in rice wine vinegar to remaining soy mixture and reserve as dressing.
4 – Toss together Napa cabbage though cilantro. Season salad with salt and pepper, toss again and reserve.
5 – Remove chicken from the marinade and discard remaining marinade. Place chicken in a baking dish and bake at 475 degrees for 20 minutes. Remove the chicken from the oven and allow to rest on a cutting board for 10 minutes. Slice the chicken into thin strips.
6 – Lay strips of chicken over salad. Top with cilantro, almonds and sesame seeds. Serve with reserved dressing.

Monday, July 13, 2015

Ready For a Little Healthy Competition?

So things have been super crazy lately!  I feel like I say that a lot...and as soon as summer is over and the oldest little one in back in preschool, I promise to set aside a day to blog and get back in the swing of things...promise!!

I've started to find that with my little peanut, the baby weight isn't falling off of me like it did before.  I know with my oldest, I didn't really do anything any differently and the weight was pretty much gone by the time she was 2 months old.  This time around...not so much.  My little peanut is quickly approaching the 5 month mark (how is THAT even possible?!?) and my weight isn't much lower than it was when I brought her home from the hospital.  Sigh.  It was time for something to change. 

Enter the hubs.

He suggested the only way either one of us was going to do anything about our weight and getting healthier was to have a contest.  If you know me or my husband, you know how competitive we can be.  If you've never met us before, let me make perfectly clear that neither one of us like to loose...at anything...ever.  His plan was to set a start and end date, each of us track our own nutrition and workout plan, and when the time was up, whoever lost the biggest percent of their starting body weight wins.  This all sounded way to familiar...and I was pretty skeptical that any of this would work...here's why.

Years back when I was still teaching, the staff did a "Biggest Loser" style challenge.  Each participant threw money into a pot, set their own personal weight loss goal and those who met their goal at the end of the challenge split the pot.  The hubs decided that he wanted to get in on the action too.  His "prize", he decided would be a new flat screen for the living room.  A few weeks before the challenge was over, Best Buy had a huge sale on TVs.  Assuring me that he was "so close" that he would definitely meet his goal and tempting me with the idea of saving a good chunk of change, I agreed to him buying the TV that he hadn't "officially" earned yet.  Want to guess what happened next?  Yep, he stopped keeping up with his plan and never met the target he had set for himself.  No worries for him though.  He was now enjoying watching football on his new TV.  Cheater.

To say the least, the thought of entering into another weight competition with him wasn't very appealing.  He had decided that the prize this time would be $150 (the exact price of the new tennis racket that has been stuck on his Amazon wish list for months).  Promising me that this time there would be no cheating or early prize receiving involved, I agreed.  This time the hubs is going down!

In order to insure success, I needed to find a way to have ultimate accountability.  First enter My Fitness Pal.  If you have never tried out this website/app before, you need to.  It is AMAZING when you use it right.  All in one place you can keep track of your food intake and exercises for the day.  There is even an option to upload recipes from the web or scan barcodes to enter your food.  And they have everything.  I mean EVERYTHING!  You take a few moments to enter your food, and it calculates your calories for you.  And I will tell you one thing.  When you look up how many calories are in that double cheeseburger you've been craving, you will think twice about eating it!

Next, I needed a plan for food.  I've always been a pretty healthy eater, but with a baby and a toddler in the house, I've been falling short on staying as healthy as I want, sometimes skipping meals completely.  I wanted something that didn't have a lot of "don't eat this" guidelines since those programs will help you loose weight only as long as you stay on them.  When you're done with the "plan" the weight tends to come back. 

I started by doing some research into the 21 Day Fix.  I've known several people who have had success with this program which seems so easy on the surface.  There is a simple equation to calculate how many calories you need a day and from there, there's a chart to show you how many of each colored (food group) containers you need.  If you buy the program, it comes with one set of containers and workouts to go along with your 21 days.  I didn't see the need to buy it myself since I have TONS of Tupperware and two other Beachbody workout products I need to dust off, so I set forth seeing if this was the program for me.

Although I LOVE the ideas of the containers so there really is no thought into how much is a serving, they get tricky to use when you are trying to work through a recipe.  Trying to work in all the servings of each container was also tricky, not going over or under.  So I kept looking.

Since the My Fitness Pal app was going to make inputting my food so easy, I decided that I would go for a diet based on clean eating...or as close to it as possible.  After all, if I'm going to make it through this challenge without wanting to kill someone, I can't completely give up a nice glass of wine at the end of a long day.  That seemed to be the best bet for my success.

So in the spirit of accountability, my starting weight is 141.4 pounds with a body fat percentage of 26.3 %.  Using the 21 Day Fix formula, I should be trying to stick close to 1200 calories.  Since I'm still breastfeeding, I had to add an extra 300 calories to that to keep my milk up which make my target 1500.  My goal is to be down 20 pounds in the 3 months that we have se for ourselves.  It's a pretty ambitious goal.  But, go big or go home, right?

So far, I've been doing pretty good.  Like I've said before, knowing that anything I put in my mouth I have to put down in the app really discourages snacking and poor food choices.  Here's been my favorite dinner from the past week. 


Triggerfish with Roasted Asparagus and Mushroom Quinoa (Quinoa adapted from Damn Delicious)
Serves 3

For the Fish:
3 pieces of trigger fish (I got this beautiful fish at Island Seafood in Ocean Isle.  If you are ever in Ocean Isle, get your fish from them.  You will NOT be disappointed.)
1 stick unsalted butter
dried minced garlic
dried dill
sea salt
black pepper

1 - Season both sides of fish with garlic, dill, salt and pepper.  In a saute pan, melt the butter over medium heat.  Once the butter is completely melted and bubbly, add your fish.  Cook for 3-4 mins per side, basting fish with butter occasionally.
     *Alternatively, you could saute the fish in 2 T olive oil and reduce the calories and fat that you take on during this cooking process.  We happened to need the extra calories and fat today, so I buttered it up!

For the asparagus:
1 bunch asparagus; ends trimmed
1 T olive oil
salt and pepper

1 - Lay asparagus out in a single layer on a baking sheet.  Pour olive oil over, season with salt and pepper and toss the asparagus to coat.  Bake at 400 degrees for 15 minutes.

For the quinoa:
1/2 c quinoa
1 T olive oil
8 oz cremini mushrooms; sliced
1 T Italian seasoning
2 T chicken broth
salt and pepper

1 - Cook quinoa according to package directions.  Make sure to rinse your quinoa well before cooking.  Once cooked, drain and reserve.
2 - Heat olive oil over medium heat.  When hot, add mushrooms and saute until slightly softened.
3 - Stir in cooked quinoa, Italian seasoning and chicken broth.  Cook, stirring often, until all liquid is absorbed.

Altogether this meal had 691 calories a serving and was loved by all members of the family.  Not bad for a quick 30 minute meal!


Tuesday, May 19, 2015

Super Easy Weeknight Dinner Anyone?

If you are anything like me, you are always on the look out for a quick and easy "go to" meal for weeknight dinners.  Since adding another wee baby to our clan, going out to dinner sometimes doesn't come with as much convince as it once did.  That plus trying to get back in shape and eat healthier to loose said baby weight has put cooking dinner every night back up high on the priority list. 

Here's my problem.  I have culinary ADD.  I always want to try something new.  Sure, I have a few go tos in my back pocket, but I find that I only go back to them when the hubs requests them.  Why?  I get bored easily.  I've never been one of those people who can eat the same things over and over again...probably one of the reasons dieting and me don't exactly see eye to eye.  I crave variety and love trying new things.  Would it be too much to ask to find a simple recipe where the ingredients could be easily exchanged so was really never the same thing twice?

For the longest time I thought this would be an impossible thing to find.  In fact when I made dinner last night, I didn't even know I had stumbled upon such a unicorn of a recipe until the hubs said something brilliant in the middle of dinner.  More on that in a minute.  Here's what we started with...

A few weeks back, I stumbled upon this recipe on Pinterest.  Dear God, what did we do before Pinterest!

From Life in the Lofthouse
I fell in love with the idea behind these wraps.  One of my favorite things in the world is a good burger.  This seemed like a healthier spin on a burger without going to far away from the original.  Quick and easy too...so I decided to make them for dinner last night.

Something happened in our house around 4pm yesterday.  Someone came in, took our two darling girls away and replaced them with a nagging 4 year old and a screaming baby.  This ever happened to you?  I was attempting to get some cupcakes and a cake done for an upcoming order when all hell broke loose.  Combined with the fact that I had been up with the baby since 4:30 that morning, and the temptation to let Papa John rescue dinner was very real.  But I was determined.

The original recipe is super easy and, I'm sure, extremely delicious.  However, in the midst of everything that was going on, I decided to take the idea and "wing" it.  I knew if this dinner was going to happen, everything needed to happen at one time.  So here's what I used.

Crazy Night Cheeseburger Wraps
1 lb hamburger
20ish grape tomatoes; quartered
4ish sandwich dill pickle slices; diced
2 T Worcestershire sauce
2 T yellow mustard
salt and pepper
flour tortillas
shredded cheese

1 - Brown hamburger, drain and return to pan.
2 - Add cut up tomatoes, pickles, Worcestershire, mustard, salt and pepper.  Cook over heat until all the ingredients are heated through.
3 - Put about a half a cup of filling onto a flour tortilla.  Sprinkle with cheese.
4 - Roll up into wrap form and grill.  I did it on our George Forman, about 2-3 minutes until nice and browned.  I'm sure this could be done on a real grill or even in a pan on the stove, but I needed something I could walk away from for a few minutes to chase around a cranky toddler.
5 - I served them with tater tots and for a few blissful moments, there was quiet in the house which is always a good sign that the food is good.

In the midst of all of the chaos, I came up with the ingredients simply thinking what I like to what I like to eat on a cheeseburger and throwing that into the pan with the cooked hamburger meat.  Here is where the genius to this recipe comes into play.  Whatever you like on your burger...throw it in with cooked hamburger meat and you have a whole new meal.  Brilliant! 

I fell more in love with this recipe when my husband broke the silence during dinner by saying, "You know this would be good with anything, chicken...steak...pork, I'd eat it every day."  That's when it hit me.  We always have meat...we always have fixins (other stuff) in the fridge...and (in our house at least) we always have tortillas.  Praise heaven above I have found a go to recipe that really CAN be different every time I make it without much forethought or planning.  Hallelujah!

I thought my obsession with this recipe would stop at dinner...but I was wrong.  In my scatterbrained fog, I put all the leftovers (tater tots and all) in the same container after dinner was over.  This morning, after a better night of sleep, I had an epiphany.  In one little Tupperware containers I have potatoes, meat and veggies.  Sounds like all the makings of a good breakfast casserole.  I started by putting some of the meat mixture and tater tots in a saute pan, breaking up the tater tots to be more "hashbrown" like.

After getting a little crisp on the potatoes, I cracked two eggs over the whole thing.
I seasoned this with a little salt and pepper and ended up with a quick, yummy breakfast scramble all in the span of time it took to brew my morning coffee.
Quick and healthy dinner with leftovers that make a quick and healthy breakfast.  Holly from Life in the Lofthouse, I know we've never met, but I love you...and I love this recipe!  Try it, you will love it too!!


Friday, May 15, 2015

Thank You Teachers!!

For seven years before I entered the culinary world, I was a teacher.  Having lived the life of a teacher for that time, I can say there is no other job out there that is more important, more challenging and more under appreciated than that of a teacher.  Not to say that other jobs aren't difficult, but at least the majority of jobs out there that are difficult are also very well respected.  Overall, teachers are underpaid, over worked and not looked at with the regard in this country that they deserve.  There is constant talk on the news about how teachers "have it made" since they get off at 3 and have the summers off.  After all, all they do is "play with kids" all day.  They may as well be considered "glorified babysitters".  None of these misconceptions are true.  Most teachers I know work at least 10-12 hours a day, making little more than minimum wage when you do the actual math, and spend countless dollars out of their own pockets to make sure their "kids" have everything they need.  What other profession out there is "expected" to work like that?  Ok...stepping off soap box.

Last week was "Teacher Appreciation Week".  While one week is not nearly enough time to show appreciation for the selfless work teachers do on a daily basis, I'm glad to shower my daughter's teacher with lots of goodies!  This time around, I was chosen to provide all the teacher's at my daughter's school with a wonderful lunch in their honor. 

For starters, I made a lovely spinach salad.  Since strawberries are at their peak right now, I added sliced of those along with some brie cheese, candied pecans, celery, red onion and cucumber.  I cheated a little and served it with a slightly warmed Ken's Light Poppy Seed dressing.  If you haven't had this salad dressing before, do yourself the favor!  You could really tip and back and drink it...at least I could...and hey, if it ain't broke right?

 
The colors were so beautiful, and everything was light and fresh.  Just what I love in a good salad.  Simple, beautiful ingredients.
 
For the main course, I made a Chicken Penne Pasta with Roasted Vegetables and Fresh Tomato Sauce.  People get a little turned off by the thought of making their own tomato sauce, but in this case, it doesn't require any additional time that you wouldn't already be cooking, so why not?
 

I used one each of the following vegetables: zucchini, green pepper, red pepper, orange pepper, red onion and one large package of button tomatoes.  I diced all the vegetables and threw them in a roasting pan with a few tablespoons of olive oil, balsamic vinegar, 6 cloves of garlic (sliced), a handful of fresh thyme sprigs, salt and pepper.  On a separate roasting pan I placed 12 roma tomatoes (quartered), 6 cloves of garlic (crushed), a handful of fresh thyme sprigs, a handful of basil leaves, salt and pepper.  I put both roasting pans in the oven at 350 degrees and roasted them for 25 minutes.  Once done, remove the thyme sprigs from both pans and discard.  Add the remaining contents of the tomato pan to a food processor and process until smooth.  If needed, thin with a little bit of chicken stock.  This will be your sauce.

Cook your penne pasta to al dente and saute chicken in a pan with olive oil and a little salt and pepper.  Once the chicken and pasta are done, dice the chicken and throw everything (sauce too) in the roasting pan with the vegetables.  Mix together well and put back in the oven at 350 for 10-15 minutes to make sure everything is nice and warm.  Viola!

For dessert, I made a marble cheesecake.  How did I choose this dessert?  Well, my daughter's teacher said her favorite dessert was chocolate or cheesecake...so I mixed the two.  I LOVE the way it came out!  Absolutely gorgeous!
Marble Cheesecake (recipe adapted from Gordon Ramsey)

2 c graham crackers
6 T butter; melted
4 1/2 oz dark chocolate; roughly chopped
1 1/4 c sugar
1 1/2 c sour cream; room temperature
2 pounds cream cheese; room temperature
3 eggs; room temperature
1 1/2 tsp vanilla extract

1 - Line a 12x8 inch pan with plastic wrap overlapping the plastic wrap so that it is at least halfway down the outside of the pan.  Tuck under so it won't be touching the racks when placed inside the oven.
2 - Crush graham crackers in food process.  Add melted butter and pulse until the mixture holds it shape when you squeeze it in your hand.  Add more butter if too dry or more cracker if too wet.  Pour out mixture into prepared pan and flatten to form the crust.  Bake at 325 degrees for 5-10 minutes, or just until you begin to smell the graham crackers cooking.  Remove from oven and allow to cool slightly.
3 - In the bowl of a mixer with paddle, beat together sugar, sour cream and cream cheese until smooth.  Add eggs one at a time, making sure each is incorporated before adding the next.  Beat in vanilla extract.  Pour batter over slightly cooled crust and tap lightly to remove air bubbles.
4 - Melt the chocolate over a double boiler or carefully in the microwave.  Swirl the chocolate over the cheesecake.
5 - Cook the cheesecake in a water bath at 275 degrees for 40-50 minutes until it is just slightly wobbly in the center.  Turn off your oven but keep your cheesecake in the oven (and water bath) for another 2 hours.  Remove cheesecake from oven and out of water bath and allow to cool in the refrigerator overnight.
 
Along with the lunch, here are some other goodies I did for teacher's last week!
Red Wine Fudge Balls anyone?
Teacher Appreciation basket full of all kinds of goodies!
Beach themed strawberry cupcakes since our teachers are "lifesavers"!
 
I've said it before and I'll say it again.  One week is defiantly not enough time to show appreciation for our teachers, but it's a start.  So THANK YOU teachers near and far for molding the minds of our young and treating them like one of your own.  Special thanks to Mrs. Laura, my little one's teacher.  You have been a wonderful blessing to her and our family this year. She has learned so much from you, and it has been amazing to watch her grow.  You are kind, caring, patient yet firm, everything our little girl needs.  We love you to pieces and hope you enjoyed your week!!
 

Thursday, May 7, 2015

Cinco de Mayo!

Next to Thanksgiving, Cinco de Mayo is probably the hubs favorite day of the year.  If he could, he would eat Mexican food everyday.  I can't even begin to tell you how excited he was that Mexican food was my big craving when I was pregnant with our little peanut.  It was like Christmas to him whenever I asked if it would be okay if we had Mexican...for the third time in a week.  So when May 5 rolls around, he gets pretty excited at what I'm going to cook up for dinner.

We used to go out to eat on Cinco de Mayo...USED to.  Now with two kids, standing in long lines and big crowds for tacos and tequila shots just isn't in the cards anymore.  Fine by me.  I would rather be able to stay in my yoga pants anyway.

This year the menu was set with a few ole favorites and a new little gem.  Chicken carnitas tacos (or rice bowl in my case), Spanish rice, corn salsa and southwestern eggrolls with avocado cream dipping sauce.  I was pretty stoked to get back in the kitchen and cook an entire dinner since most of my dinners since the peanut was born have consisted of reheating freezer meals and most of my time in the kitchen had been consumed in baking projects.  Not that I'm complaining, but it's always nice to get to "just cook" once in a while!  Of course, things didn't really do as planned.

Tuesday was pretty rough in our house.  The little peanut had a rough night on Monday which typically translates to an easy day...not the case.  When she wasn't attached to me, she was crying.  It's pretty impossible to get anything done when your trying to calm a screaming baby, so I was pretty thankful that one of the items on the menu was done mostly in the crockpot...until I looked at the clock and saw it was almost 4 already and there was no longer time to slow cook my chicken for 6 hours in the crock pot.  Ok...backup plan.

I took the same ingredients that were supposed to go into my crock pot and put everything in a pot on the stove, threw the cover on and put it over medium heat.  Once things got going, I reduced the heat to low and let it cook for about 1 1/2 hours.  Not quite the "low and slow" I was hoping for, but it worked in a pinch!

Chicken Carnitas (adapted from Closet Cooking)
1 1/2 lbs chicken thighs
3/4 c orange juice
1/4 c lime juice
6 garlic cloves; sliced
1 T chili powder
1 tsp cumin
1 tsp oregano
1/2 tsp salt
1/2 tsp pepper

1 - Place chicken in a crock pot.  Add remaining ingredients and stir to combine and cover chicken.  Cover the crock pot and cook on low for 6-8 hours.  (Or if you run short on time, cook like I did above)
2 - Remove chicken from crock pot and shred.  Put 1/2 cup juice from the crock pot onto a baking sheet, add chicken and toss to coat.  Bake chicken at 425 for 7-8 mins until the edges are nice and crisp.  Don't skip this step!  It definitely adds another element to your chicken!!


I made some Spanish rice to go along with the chicken and had a nice little meal.  The hubs made tacos out of the chicken and corn salsa, but I was just as happy making a little rice bowl with all the ingredients.  Super yummy!

The next big menu item was Southwestern eggrolls.  You want to know the way to my hubby's heart...it's eggrolls.  Southwestern may be his favorite, due to his affection with all Mexican fare, but throw anything into an eggroll wrapper and he's a happy fellow.

Since I'm trying to be healthier these days in an effort to loose the baby weight, I decided to try a recipe that had the eggrolls being baked, not fried.  That was a huge fail!  After baking the eggrolls just as the recipe had stated, they were still limp and not crisping at all.  Definitely NOT something you want in an eggroll.  Thankfully, a quick pan fry saved the day and we ended up with these beauties.
Since every recipe I've ever found for any kind of eggroll provides you with more filling than you ever need, I put half the filling in the eggrolls and took the other half of the filling (sans cheese) to use as corn salsa.  One recipe, two menu items!  Done and done!

Southwestern Eggrolls (adapted from Nutritious Eats)
(This is the full recipe and will make about 20 eggrolls.  If you don't need that many, either cut the recipe in half or save half of the filling for a yummy salsa.)

2 c frozen corn; thawed
15 oz can blak beans; rinsed, drained
1 c Mexican cheese blend; shredded
1 can Rotel
1 large green onion; chopped
1/ c fresh cilantro; chopped
1 tsp cumin
1/2 tsp chili powder
1 tsp salt
1/2 tsp pepper
egg roll wrappers

1 - Combine corn through pepper in a small bowl and mix well.  Use about 1/4 c of filling per eggroll wrapper.  Roll eggrolls as directed on the package, using a little water to insure you get a nice, tight seal.
2 - Heat 1 inch oil in a pan to about 350.  Pan fry eggrolls for 3-4 minutes per side until nice and golden brown.

Avocado Dipping Sauce (adapted from Bobby Dean)
1 avocado; ripe
1/2 c sour cream
1 lime; juiced
salt and pepper to taste

1 - Place avocado, sour cream and lime juice in a food processor and process until smooth.  Season to taste with salt and pepper.

Of course, we had a margarita...or two...to wash everything down and our Mexican fiesta was a success!