Monday, March 23, 2015

My Little Peanut and the BEST Cookies Ever!

I knew it had been a while since I was on the blog, but I had no idea it had been as long as it has!!  I have missed writing and need to get back in the swing of things soon!  However, my absence hasn't been completely unwarranted.  A month ago today my family grew by one amazing little peanut.

Isn't she beautiful!!  I can take credit for the beautiful little girl, but I have to credit to Portraits by Crystal for the beautiful photo!  Such a talented new mommy herself.  In honor of our sweet little peanut making her entrance into this world, I decided to share with you the recipe for the BEST COOKIE EVER!

A few months ago my little one wanted to make peanut butter cookies.  I've tried several PB cookie recipes before and they were always just ok.  So this time around, I went on the search for one that would be a keeper.  Boy did I find the perfect recipe!  These cookies are chewy, gooey and h so peanut buttery!  They are the kind of cookie that make me cry for all those out there allergic to peanut butter since they will never know the yummy goodness that exists within them!  Of course, having an adorable sous chef to help me bake up a batch was extra icing on the cake!


The only other thing you need to know about these cookies is they make BIG cookies.  Do yourself a favor and keep them big!  The size helps keep them moist and chewy on the inside while being slightly crunchy on the outside.  So without further ado...here you go.  Get the milk ready!
 
The Perfect Peanut Butter Cookie (recipe adapted from Wallflour Girl)
 
1 egg, at room temperature
1 c light brown sugar, packed
1 c peanut butter (I'm a snob and only use JIF so I take no responsibility for the outcome if you use a slightly less appealing peanut butter..haha!)
1/2 c butter, melted
1 T vanilla extract
1 3/4 c AP flour
1/2 tsp baking soda
1/4 tsp salt
1 c chocolate chips
 
1 - In a stand mixer with paddle attachment, cream egg, brown sugar, peanut butter and vanilla for 5-6 minutes until very fluffy.  *Side note...This can be done by hand if you don't have a mixer, just be prepared for an intensive arm workout...which probably isn't so bad before eating the cookies!
2 - Add flour, baking soda and salt and mix until incorporated.
3 - Toss your chocolate chips in about a tablespoon of flour and fold into your cookie batter.  Doing this will help the chips hold their shape in the oven.
 
4 - Use an ice cream scoop to portion your cookies onto a greased cookie sheet.  You really want the cookies to come out looking like little scoops of ice cream, taller than they are wider.  Gently push down on each cookie to make the top flat but don't smoosh.  Cover the sheet tightly with plastic warp and chill in the refrigerator for at least 2 hours or the freezer for 45 minutes.  The original recipe had you chilling the dough before portioning it, which make it pretty impossible to scoop after it's hard.  Save yourself the headache and portion before but DON'T SKIMP on the chilling time!  Trust me!
5 - Preheat your oven to 350 degrees.  Bake cookies for 8-12 minutes until the edges are golden brown and the centers are still nice and soft.  Allow them to cool for 5-10 minutes before eating...if you can wait that long!
6 - Store any leftovers...weren't any in my house...in an airtight container.
ENJOY!!


Monday, October 27, 2014

This is Halloween!

Those who know me know that I LOVE Halloween.  It's hard to say it's my favorite holiday since I love Christmas too, but Halloween is right up there!  There's nothing about this time of year that I do not adore.  The weather is amazing, dressing up is always fun and I'm all in for anything spooky or scary!  Last year, Halloween was the first holiday we missed out on being overseas.  So this year, I made it my main goal to have the new house ready for visitors so we could have a Halloween party.

Thankfully, I got it all done and a blast was had by all who attended.  As usual, I had a blast putting together all the theme food and finding the perfect outfit for the hubs and I to dress up as.  There's too many recipes to list them all, so here are the pics...and perhaps a few recipes to come soon!  Everyone have a HAPPY HALLOWEEN!!

Bloodshot Deviled Egg Eyeballs

Green Slime (Green Goddess) Dip with Vegetables

Crunchy Haystacks (Cookies)

Red Velvet Brain Cupcakes...though they look a little more like skeletons

Spooky Smoked Gouda Pimento Cheese

Roasted Rack of Ribs

Bat (Chicken) Wings

The Robber and his Bag 'O Loot

Our sweet little Rapunzel


Wednesday, October 22, 2014

Fishing for a New Fish

No, I'm not a big fisher but I do love to find new and interesting ingredients that I've never heard of before and play around with them.  One of the things I love about the area we live in now is all the Farmer's Markets.  Not that there weren't any in Charlotte, but there's something different about the ones here.  They are smaller, quaint and everywhere!

We came across one a few weeks back and, of course, had to check it out.  My poor hubs has been drug to markets all over the world and still, most of the time, puts on a good face knowing that something yummy is probably coming his way at dinner that night.  Today was no exception.

One of the vendors at this particular market was a small, almost traveling grocery store.  Aside from the fact that their trailer was set up on a hill making it impossible for me to stay inside for more than a few minutes without feeling sick, it was wonderful!  Tons of fresh produce, meats, dairy and breads lined the small walls.  I was intrigued looking at the multitude this little gem had to offer when the owner happened by telling us that all the frozen seafood they had was 40% off today in order to make room for new product.  Sold!  I was getting something for dinner.  The only question was what to choose.

I ventured over to the cooler seeing things I had seen elsewhere, scallops...flounder...grouper.  All good choices, but I really wanted something new.  That's when I saw a single pack of Sheepshead. 
Having never heard of it before, I asked what it was like.  "Kind of buttery, almost along the lines of lobster" the lady told us.  Sold again!  Time to go home and play.

Of course, I had to google the fish as soon as I got home.  I wanted to know more about it.  When I looked up pictures of the fish in the wild, I was pretty shocked.  Ever seen a fish with teeth before?  Me neither!?!

I learned these are saltwater fish found in the Atlantic Ocean whose diet consists mostly of oysters, clams and other crustaceans.  Their teeth help crush the shells of their prey, since they eat everything whole.  It's commonly nicknamed the fish with the human teeth...and I can definitely see why!

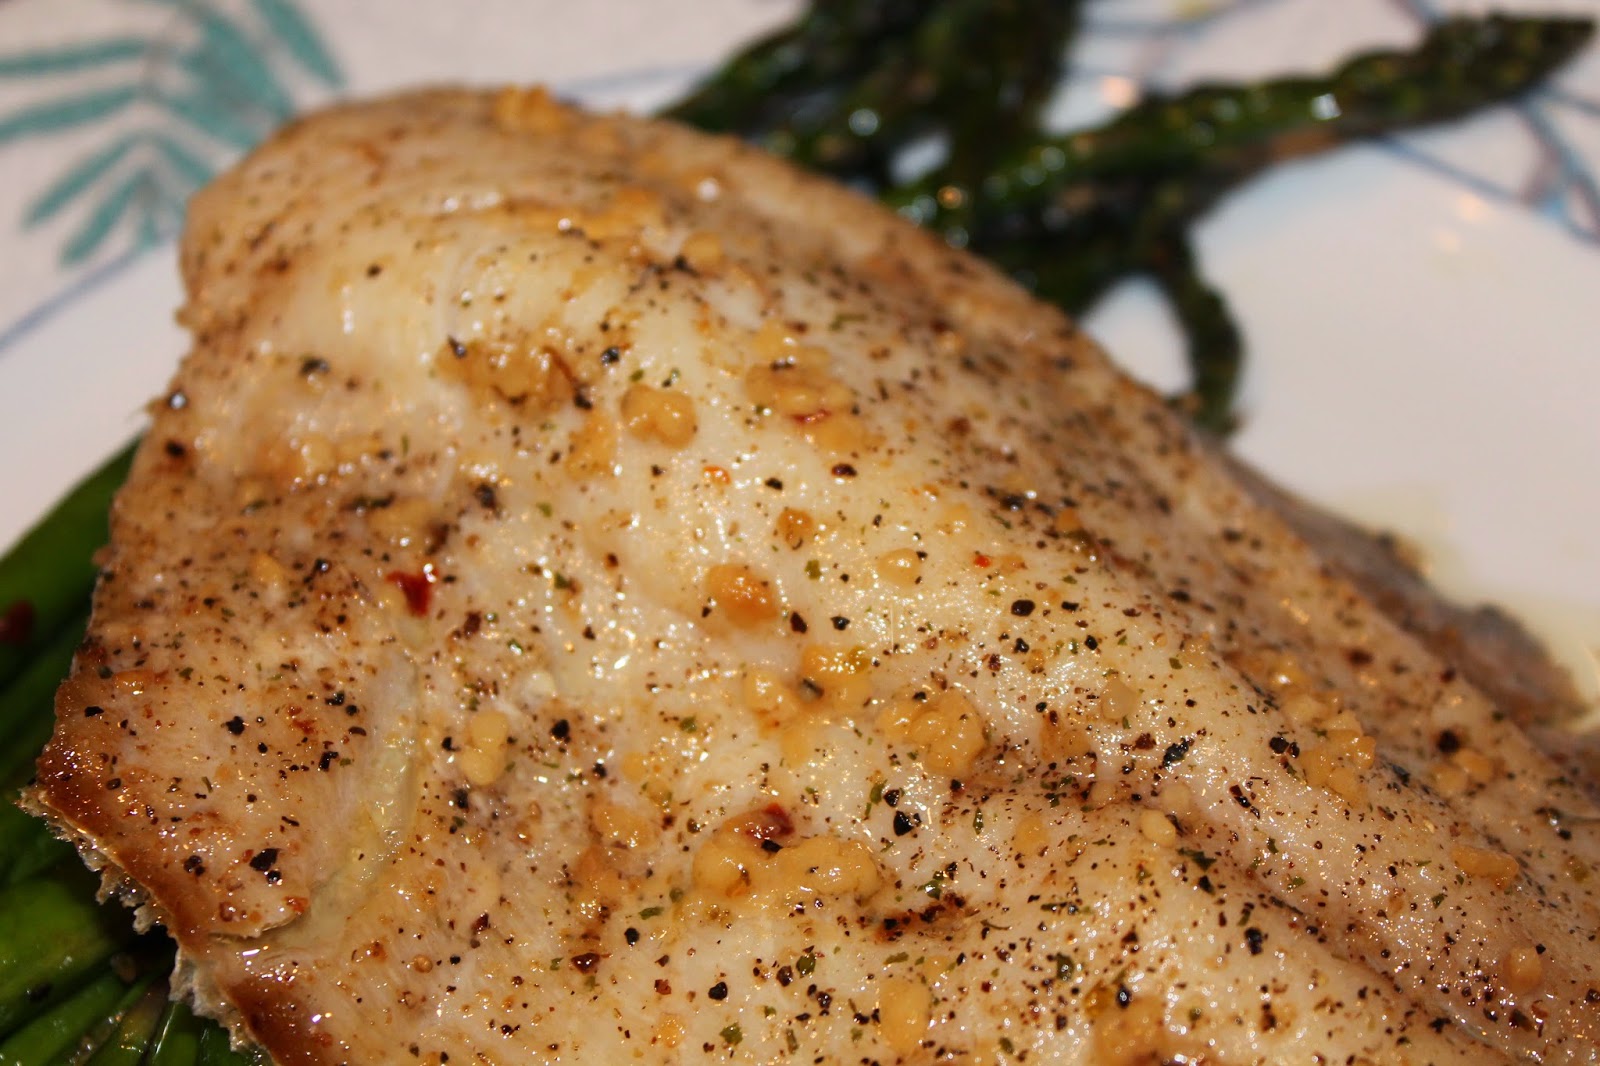
For this preparation, I decided to keep things very simple.  Having never had the fish before, I wanted the natural flavor to come through as much as possible without being over shadowed by a bunch of spices.  I seasoned the fish with salt and pepper.  I then threw a stick of butter in a pot with 1/4 c of white wine and some dry roasted garlic flakes.  I let this cook down until the butter was slightly browned and reduced a bit and used is to baste the fish as I broiled it.  I severed it up with a side of roasted asparagus. 


The result?  OMG...it was sooo good!  The fish was buttery, rich and super moist.  Even the little one gobbled it all up with out so much as a peep.  I can only hope that I will be able to find this fish again since it has now become one of my favorites!  Guess that's the only real danger in trying ingredients you don't come across very often.  Oh well, this time I've come across a gem and you can bet that I won't pass it up if I see it again!

So what's your favorite thing to play around with in the kitchen?

Tuesday, October 21, 2014

Forging for Brownies?

 
So a good friend of mine is a blacksmith...or in contemporary day terms...a metal worker.  Cool, huh?  She's really talented, and I love seeing all her new projects!  Currently, she is working on a really big project called ShopSpace where she and some of her friends are striving to create a communal space for current metal workers as well as an area they can teach others the craft.

A few weeks back, they had an open house at the space.  It's pretty amazing.  I even had the opportunity to do a little forging myself.
 I was pretty stoked to have the opportunity to make something and, I have to say, pleasantly surprised how well I did for the first time.  More than that, I think I was surprised that more people didn't want to take a turn hammering away on red hot metal.  I mean, who wouldn't right?

My contribution to this little event was some brownies, my go to quick and easy recipe that I have been making for people since I was about 10 years old.  I even had a babysitter at the time who wanted me to make them for her ever time she watched us overnight.  They are super quick, super yummy and always a hit.  Nowadays I even have an adorable little helper to assist in all the mixing.
Isn't she the cutest?!?  Of course her favorite part is licking the whisk after she's done!  Try out these no fail treats.  They are sure to put a big 'ole smile on your face!

The Best Brownies EVER! - Makes about 16 (Adopted from the Hershey cookbook)
4 oz butter; melted
1 c sugar
1 T vanilla extract
2 eggs
1/2 c all purpose flour
1/3 c cocoa powder
1/4 tsp baking powder
1/4 tsp salt
1 T cinnamon

1 - In a bowl, stir together butter, sugar and vanilla.  Add eggs, one at a time, beating well to incorporate before adding the next one. 
2 - In a separate bowl, combine flour, coca, baking powder, salt and cinnamon.  Add to egg mixture in three different batches, incorporating each batch before adding more.  Pour batter into well greased 9x9 pan.
3 - Bake brownies at 350 degrees for about 20 minutes until they begin to pull away from the sides of the pan and the middle is almost completely set.  Cool completely, cut into squares and ENJOY!

Sunday, September 28, 2014

Hot Soup on a Warm Night?

I don't know what the weather has been like in your neck of the woods, but this past week it was rainy, cold and all around gloomy.  I'm right up at the front of the line wanting fall to be here, but I hate the misty nasty rain that keeps you from being able to go out and enjoy the cooler weather.  YUCK!

In preparing for the drop in temperature, I planned to try out some new soup recipes.  I looked though my Pinterest page to see what popped out and found a little gem for Cheeseburger Soup.  Sounded like a winner!  I had best laid plans to do this early in the week...and then this week happened.  I've been having some killer headaches with this little bun in the oven and this week they were in full swing.  So, we lived off leftovers and pizza for the better part of the week, but by Friday I was ready to go!  Of course, Friday was the first day the sun came out and the temperature went up.  Oh well...soup I was craving and soup we would have!

Still, I wanted a little something more to go with the soup.  And what goes better with soup than bread?  The hubs LOVES bread and reminds me often that we don't have it at dinner enough.  Since it had been quite some time since I made fresh bread, I was excited to try out a new recipe there as well.  My biggest craving with this pregnancy, strangely enough, has been beer.  So when I came across a recipe for Basil Beer Bread, I was sold!

Some tips for recreating this meal.  The soup is meant to be made in the crock pot.  I started the soup in the crock pot...and then ran out of time for not starting soon enough...and switched it to a pot on the stove.  This wasn't the best idea.  Unless you are going to stand over the stove and stir this soup constantly, make sure you leave yourself the extra time to let the crock pot do the work for you!

In the end, the soup was pretty thick.  I didn't mind this since I like a heartier soup anyway, but if you wanted it a little thinner, I would suggest doubling the chicken stock.  Between the cheese and the hash browns, a lot of liquid is soaked up!

The bread is probably one of the simplest you will make...EVER!  The recipe wasn't really specific about the type of beer to use, so I picked out a nutty ale at the grocery store.  Here's the one I used:
 It was pretty perfect!  If you can't find this exact beer, I would stick to something a little stronger and in the "nut ale" family.  The flavor really comes through in the bread.  Even the little one ate it all up so it must have been good!

The bread also called for fresh basil, which I thought I had, but turns out I was wrong.  I substitutes about 2 T dried basil for the fresh and the flavor came though.  I would love to experiment with this again to see if I can taste a difference by using fresh basil, but in a pinch dried will work beautifully!

Cheeseburger Soup - Serves 8-10 (I wish I could credit the person who originally pinned this, but the link was broken.  Thankfully the ingredients were in the description!)

1 pound ground beef; browned and drained
2 pounds Velveeta; cut into cubes
2 pounds shredded hash browns (I used 2 packs of Simply Potatoes Hash Browns, one original and one Southwest style for a little kick)
1 pound bacon; cooked, drained and crumbled
30 ounces chicken broth (more for a thinner soup)
1 T each dried basil, garlic, pepper, salt, tarragon and thyme

1 - Make sure beef is browned ad drained and bacon is cooked, drained and crumbled.  Throw all ingredients in a crock pot and cook over high for 2-4 hours or low for 4-6 hours, stirring every now and then to mix everything up.  Easy as that!
 
Basil Beer Bread - Makes 1 loaf, size of the average meatloaf pan (Adapted from Drizzle and Dip)

3 cups AP flour
1 bunch of fresh basil; chopped (or 2 T dried basil)
4 tsp baking powder
1 tsp salt
1 T brown sugar
330mL beer; room temperature

1 - Using a stand mixer with dough hook attachment, mix the dry ingredients together.  Add beer and mix on low speed for 3-5 minutes until the dough bounces back when you press it.
2 - Grease a meatloaf pan.  Add the dough and press down so the dough covers the pan evenly.  Bake at 350 degrees for 40-50 minutes until lightly browned.  Allow to cool slightly before slicing and eating.

On a side note, the wonderful hubs found my camera battery charger!  No more phone pics for this girl!!

Saturday, September 13, 2014

Can You Smell Fall Coming?

It's been almost a month to the day since we moved into the new house in Clayton.  Although we are still having some hot days, the cooler mornings and evenings are proof that fall really is on the way, and I couldn't be more excited.  See this time last year we were packing up to leave the country for the rest of the year and basically missed fall.  Sure it got cooler and cold in France, but the leaves didn't change, the holidays weren't celebrated the same and everything I love about this time of the year was gone.  So this year I want to do everything I can to enjoy every minute!!

Moving is always stressful, so I was excited to meet our new neighbors almost as soon as we moved in.  Everyone we have met is super friendly, more proof that we moved to the right place!  This week I got invited to a ladies Bunco night in the neighborhood with the instructions to bring a bottle of wine or a snack.  Since I can't drink with a little bambino growing in the tummy, I decided to use this opportunity to try out a new cupcake recipe.  Trying out new sweet treats is a little more challenging now that we've moved since the hubs isn't a fan of desserts and I no longer have his employees I can send them too.  I wanted something new, something that was a perfect fall welcome and something everyone could enjoy.  That's when it hit me the one "fall thing" that has been trending on all the social media lately...Pumpkin Spice Lattes.  That little Starbucks drink that people everywhere wait all year for.  Pumpkin is pretty much the "end all be all" of fall flavors so why not turn the legendary drink into a cupcake?

So I turned to the place we all go for inspiration...Pinterest!  Really, what did we do before this website existed?  To my surprise, I found tons of recipes out there dedicated to turning the flavors of the beloved drink into all things edible.  After weeding through several recipes that used a box cake mix as the base...which is a HUGE pet peeve of mine...I finally landed on one from Table for Two.  I made an adjustment here and there to make the recipe my own and the outcome was amazing!  The little one ate hers up, hubs gave it his "other people will like this" stamp of approval and I left the party with a clean platter!  Since my camera battery is still in a box somewhere and said camera is dead, I didn't get a good picture of my actual cupcakes.  But here's one from the Table for Two blog to show off the yummy goodness!


I only made a few small additions to the original recipe.  Once I mixed the batter, it still tasted like it needed something so I added some vanilla, which did the trick.  I also mixed up a quick cream cheese filling to go on the inside of the cupcakes which I felt added a nice little break up of flavor overall.  The simple whipped frosting is the perfect finishing touch and definitely reminds me of the actually latte topping!  Careful with it though, since it's just sweetened whipped cream, it will melt easily if put in the heat! 

Getting back in the kitchen to do some baking really got me excited for the upcoming season and seeing how many more twists of classics I can come up with!  Let the recipe testing begin!!

Pumpkin Spice Latte Cupcakes (adapted from Table for Two)
Makes 2 dozen cupcakes or one 2 layer 9 inch cake

Cupcakes:
     2 2/3 c all purpose flour
     3 T espresso powder
     2 tsp baking soda
     2 tsp baking powder
     1/2 T pumpkin pie spice
     15 oz can pumpkin puree
     1 c sugar
     1 c brown sugar
     1 c vegetable oil
     1 T vanilla extract
     4 eggs
     1/2 c coffee; brewed and slightly cooled for brushing
Filling:
     1 c cream cheese
     4 T cinnamon
     2 T sugar
     1/2 T pumpkin pie spice
Frosting:
     2 1/4 c whipping cream; chilled
     1/4 c powdered sugar
Topping:
     10 caramel candies (or make your own caramel if you're feeling ambitious!)
     2 T whipping cream

For cupcakes:
1 - Preheat the oven to 350 degrees.  Line muffin tins with cups or grease and flour two 9 inch cake pans.
2 - In a bowl, whisk together flour, espresso powder, baking soda, baking powder and pumpkin pie spice.  
3 - In the bowl of a stand mixer with paddle, combine pumpkin puree, sugar, brown sugar, oil and vanilla.  Mix until well combined.
4 - Add eggs one at a time, incorporating each before adding the next one.
5 - Add the dry ingredients in three additions, mixing each just until the ingredients are incorporated.
6 - Divide batter evenly between muffin tins (using about 1/4 to 1/3 c for each tin) or between the two cake pans.
7 - Bake 15-20 minutes until tester comes out clean.
8 - Allow cupcakes to cool slightly.  Brush the tops of the cupcakes or cakes with coffee.  Apply three coats total, allowing the coffee to soak in between each coat.  Remove cupcakes from tins or cakes from the pans and allow to cool completely on wire racks.

For filling:
1 - Put all ingredients in a stand mixer with whip and cream until smooth.  
2 - Using a corer or small spoon, remove a small part from the center of each cupcake.  Pipe the filling into the center of each cupcake.  If making the cake, simply spread the filling on top of one cake layer before adding the second layer.

For frosting:
1 - In stand mixer with whip, whip cream to soft peaks.  Gradually add powdered sugar and whip to stiff peak.  Pipe as desired onto cupcakes.  (Note: More frosting will probably be needed if frosting a 9 inch cake.  I would start by upping the recipe by half and whipping more cream as needed.)

For topping:
1 - Combine the caramels and cream in a small sauce pot over low heat, stirring occasionally until the caramels are melted.  Allow to cool completely before drizzling on cupcakes or cake.

Now you can drink your Starbucks and eat it too!  ENJOY!

Friday, August 1, 2014

A Ray of Sun on a Cloudy Day

I can't believe how long it's been since I've been able to find time enough to myself to sit down and write!  Things have been pretty hectic around our house lately with lots of transitions going on for our family.  Still, through all the hubbub, I was able to help a very dear friend make a very special day a little more colorful.

I was excited about the opportunity to make a cake for a beautiful little girls Baptism.  I was even more excited when her mom sent me an idea for a cake I had never done before, a Rainbow Cake!  Ever since spending time oversees, I've had a slight obsession with "surprise" inside desserts.  So, needless to say, I was a bit giddy at getting to take on this new challenge.  Fortunately, this turned out to be a lot easier than the checkerboard cake I made for my daughter's birthday last year!  Pictures of that cake will not be posted...take my word...it was a disaster and left me wanting to pull my hair out!  If you ever get the wild idea to try it, keep in mind, more time and lots of alcohol will be needed to keep you from loosing your mind!!

The Rainbow Cake, however was really very simple.  Time consuming only in the fact that I had to bake twice since I only had three 9 inch cake pans.  But that wasn't a problem for me since I had a cute little beauty to play with in between!  I whipped up my favorite white cake recipe, making enough batter to essentially make two three layer 9 inch cakes.  I then divided the batter into 6 equal portions and added food coloring to each portion to get all the colors of the rainbow.  It was so easy, even my own little adorable helper was able to lend a hand!


After all the cakes were baked and cooled, I mixed a batch of my "no fail" buttercream, filled the inside with some white chocolate lavender ganache I had left over from a wedding and stacked the monster.  It was tall!  The tallest since tier cake I had ever done.

For the outside, I mixed together some blue and white buttercream to give the illusion of clouds and bordered the cake to look like crashing waves.  Leaving the outside of the cake looking like this...


And the inside looking like this...


I was in love with how vibrant the colors came out!  Most importantly, mommy was happy with the outcome as well.  This will definitely be one I keep in my bag of tricks to pull out again!  After all, who could be glum on a rainy day when you have this to feast upon? Now for what you've been waiting for...the recipes for this masterpiece!

The LAST White Cake Recipe You Will EVER Need (adapted from Sweetapolita)
Makes 1, three layer, 9 inch cake

7 egg whites; room temperature
2 whole eggs; room temperature
1 1/2 c milk; room temperature
4 tsp vanilla extract
4 1/2 c cake flour; sifted
3 c sugar
3 T baking powder
1 tsp salt
18 T butter; cold, cut into 18 pieces

1 - Preheat over to 350 degrees.  Grease and flour three 9 inch cake pans.
2 - In a bowl, combine egg whites, whole eggs, 1/2 c milk and vanilla.
3 - In the bowl of a stand mixer with paddle, combine dry ingredients until mixed.
4 - Add butter to the dry ingredients, one piece at a time, until all butter is incorporated and mixture is crumbly.
5 - Add remaining milk and mix until well incorporated.  Scrape the bowl well.  Add the egg mixture in three batches, making sure to incorporate each addition before adding more.  Scrape the bowl between additions as well.
6 - Bake the cakes for 20-40 minutes until a cake tester comes out clean.  Allow to cool in pans for 10 minutes before removing and completely cooling on wire racks.
*If making the rainbow cake, add food coloring as needed to the cake batter.  Make sure to make the batter slightly darker than you want the actual cake to be since the color will dull in the oven.

"No Fail" Buttercream (adopted from Savory Sweet Life)
Makes 5 cups

1 c unsalted butter; room temperature
1 c shortening
8 c powdered sugar; sifted
1/2 tsp salt
2 T vanilla extract
4-8 T heavy cream

1 - In the bowl of a stand mixer with paddle attachment, cream together the butter and shortening.
2 - Gradually add the powdered sugar, about 2 c at a time, incorporating completely before adding more.
3 - Once all sugar has been added, add the salt, vanilla and 4 T heavy cream.  Whip the buttercream on medium high speed for 5-6 minutes.
4 - If your frosting needs to be thinned, add more cream 1 T at a time and mixing for 2-3 minutes before adding more.  If your frosting needs to be stiffened, add more sifted powdered sugar.  Color, if desired, and use as soon as possible for best results.  Enjoy!